Basic Scripting Guide
Creating a Script
Scripts can be added to a robot using a microcontroller part. Microcontrollers can be found in the parts inventory under the “Powered” category or by searching “microcontroller”. If the part is still locked for you, go to the sandbox and it will be unlocked there.

Once you’ve placed one on the robot, navigate over to the properties tab to see the interface for attaching scripts.
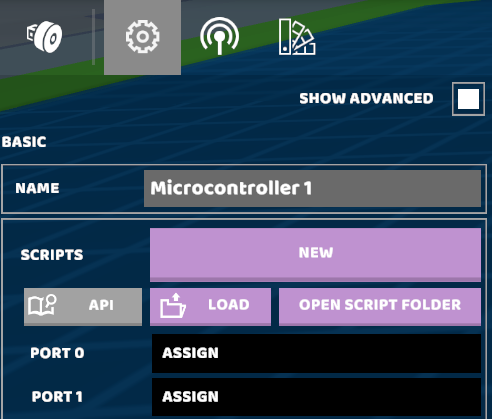
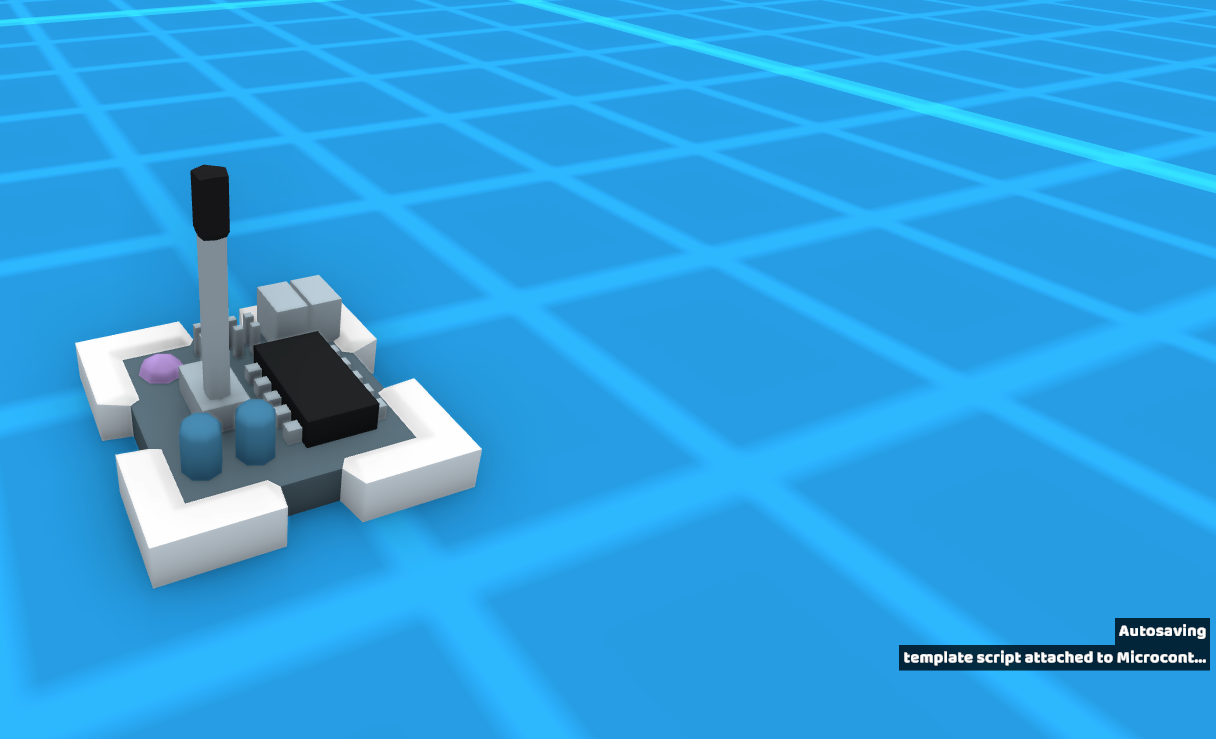
Use the “NEW” button to create and name a new script from the RoboCo scripting template. A script preview will then appear to the right of the properties panel to show that the script was attached.
To edit this script you may either select the “OPEN SCRIPT FOLDER” button and open the script from the folder or, if you followed the IDE Setup, you can open your scripts folder as a workspace in your IDE and open the script in VS Code.
The Template
Once you have the script open in your IDE, it should look something like this:
from inputs import *
from controllables import *
from sensors import *
from scriptruntime import *
from ports import *
from color import *
from routines import *
from math import tau
from time import sleep


def main():
    print('template script attached to ' + MicroController.self().name())

if __name__ == "__main__":
    main()
The first 9 lines are import statements that tell
python that you want to use code from the RoboCo API.
Then there’s a function called main whose body is
example code to print a string that contains the
name of this script’s microcontroller. After main
there is code that calls main. The
__name__ == "__main__" check is a pythonic way
to determine if your script is being run as a script
or being imported into another script.1
If you enter live mode with the script on a microcontroller you should see a print statement like this:
To get a more permanent look at the print statement, open it in the console tab:

To see what a script looks like without the boilerplate of the template, replace the whole script with just the following 1 line “Hello World” script.
print("Hello, World!")
The RoboCo API
However, it takes more than print statements to program a
robot. You’ll want your scripts to spin motors and read
sensors. To do that, you’ll need the RoboCo API. An API
is just a collection of types and functions written by
someone else for you to use in your program. The RoboCo
API will provide you with functions like
spin() to spin a
dc motor. In order to use this function you must
to import the DCMotor class
from the module controllables. The template
above imports a lot of classes, but in its simplest form
importing and using those classes can look like either of
the following examples:
import controllables

controllables.DCMotor(0).spin()
from controllables import DCMotor

DCMotor(0).spin()
The first way imports the whole module
controllables and then accesses the
class from it, while the second way just imports the
class that it wants and accesses it directly. Another
option is to import all the classes from the module
like this:
from controllables import *

DCMotor(0).spin()
Piston(1).move()
Ports and Controllables
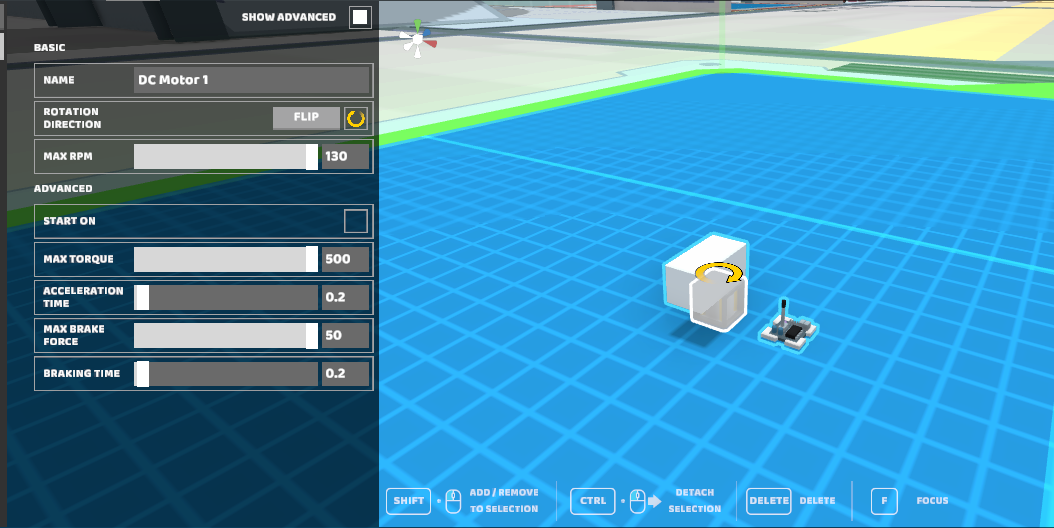
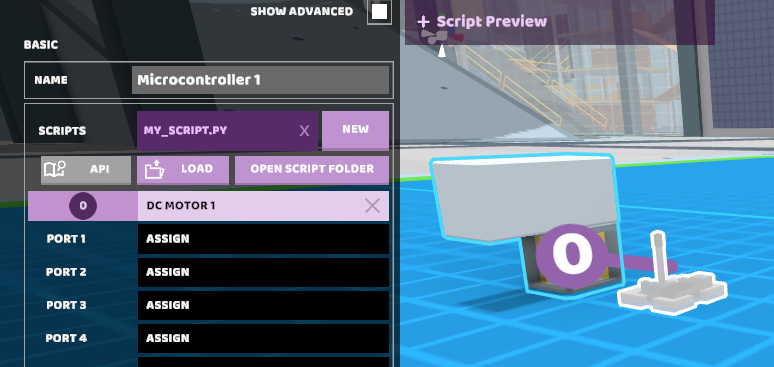
If you want to do anything with these functions, you’ll need a motor to spin. Let’s start by adding a DC motor to the robot with something for it to spin.
In order for the script to access the motor, the motor needs to be assigned to a “port” on the script’s microcontroller. To do that, select the microcontroller in the properties tab. Then click the “ASSIGN” button for “PORT 0”, and then click the on either the motor itself or the motor’s button on the leftmost panel.
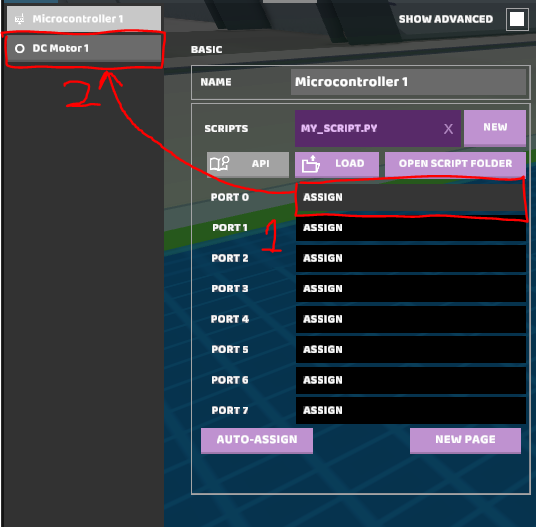
When you’re done it should look like this:
Now replace your script with this code:
from controllables import DCMotor

# get the motor from port zero
motor = DCMotor(0)

# make it spin
motor.spin()
First you assign DCMotor(0) to a variable named
motor. The 0 here means that you want
the part assigned to port 0. Next, you call the spin
method on the motor which will make it start
spinning. If you go into live mode the motor should
start spinning right away.
Sleep
In order to write a script that doesn’t finish right
away, you can make use of the sleep
function. It causes the script to stop running
for some number of seconds, before resuming where
it left off. This can be handy for sequencing actions
over time.
from time import sleep
from controllables import DCMotor

# get the motor from port 0
motor = DCMotor(0)

motor.spin()# makes the motor start spinning
sleep(1)# our code waits for 1 second
motor.stop()# then stops the motor
sleep(1)# then the code waits again
motor.spin(power = -1)# spins the motor in reverse
sleep(1)# let the motor spin for 1 second
motor.stop()# finally stop the motor
When you enter play mode the above code should make the motor spin forward for one second, then stop for another second, then spin in reverse for a second before stopping again.
Input and “The Loop”
To make the robot a bit more interesting we’d like
to get it to respond to user input. For that,
import the inputs module. In the above
script, your code ran for a few seconds before
finishing. To get the code to run forever write a
while loop that never terminates.
from controllables import DCMotor
from inputs import Input

# spin the motor on port 0
motor = DCMotor(0)
motor.spin()

# repeat this code forever
while True:
    # spin the motor only when x is pressed
    if Input.pressed("x"):
        motor.spin()
    else:
        motor.stop()
This script spins the motor when the x key is
pressed and stops the motor when it is released.
It runs constantly rechecking the status
of the x key and calling
spin() or
stop(). Because the
loop condition is True, it will run until the
robot is shutdown as you exit live mode.
The Text Screen
When you’re programming, you’ll often want to print
out data so that you can understand what is
happening in your code. If you do this inside a
loop it can be really hard to actually read the
data as it spams the console. To make things easier
(and more fun) we recommend using the
TextScreen part to output
useful information.
After placing and appropriately sizing the Text
Screen part, you can assign it to port 1 of your
microcontroller.
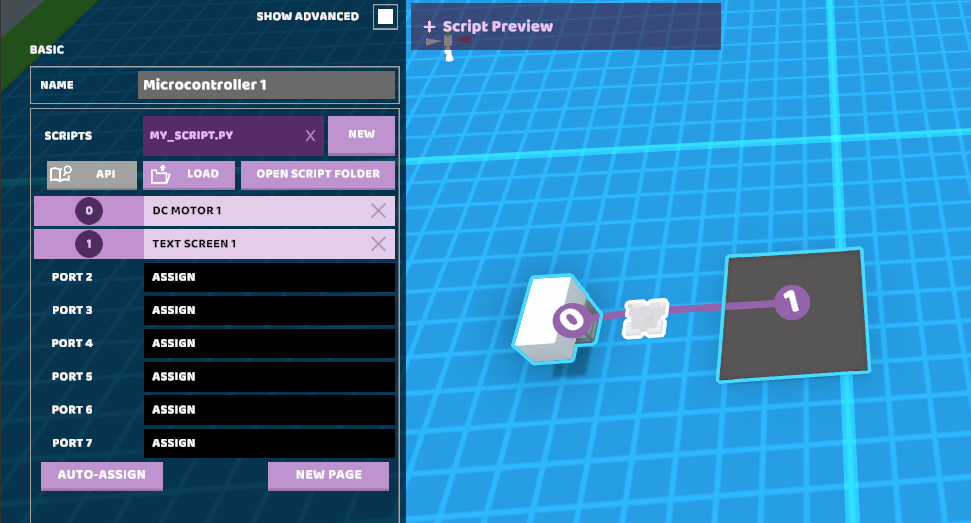
Now you can output text to it in the script when
you access it on port 1.
from controllables import DCMotor, TextScreen
from inputs import Input

# spin the motor on port 0
motor = DCMotor(0)
motor.spin()

# get the text screen on port 1
screen = TextScreen(1)

while True:
    # spin the motor only when x is pressed
    if Input.pressed("x"):
        motor.spin()
    else:
        motor.stop()

    # set the text value of the screen
    screen.text = "rpm = " + str(motor.rpm())
If you want to format the text and output multiple data points you might want to consider string formatting.
from controllables import DCMotor, TextScreen
from inputs import Input

# spin the motor on port 0
motor = DCMotor(0)
motor.spin()

# setup the screen on port 2 with left alignment
screen = TextScreen(1)
screen.horizontal_alignment = TextScreen.HorizontalAlignment.LEFT

while True:
    # spin the motor only when x is pressed
    if Input.pressed("x"):
        motor.spin()
    else:
        motor.stop()

    # set the screen to a multiline formatted string
    screen.text = (
f"""
rpm     = {motor.rpm():03.0f}
degrees = {motor.degrees():03.0f}
"""
    )
Sensors
To get something more interesting to print we can
grab a DistanceSensor from the
inventory. Try placing a distance sensor on a piston
and assigning them to ports 0 and 1 like this:
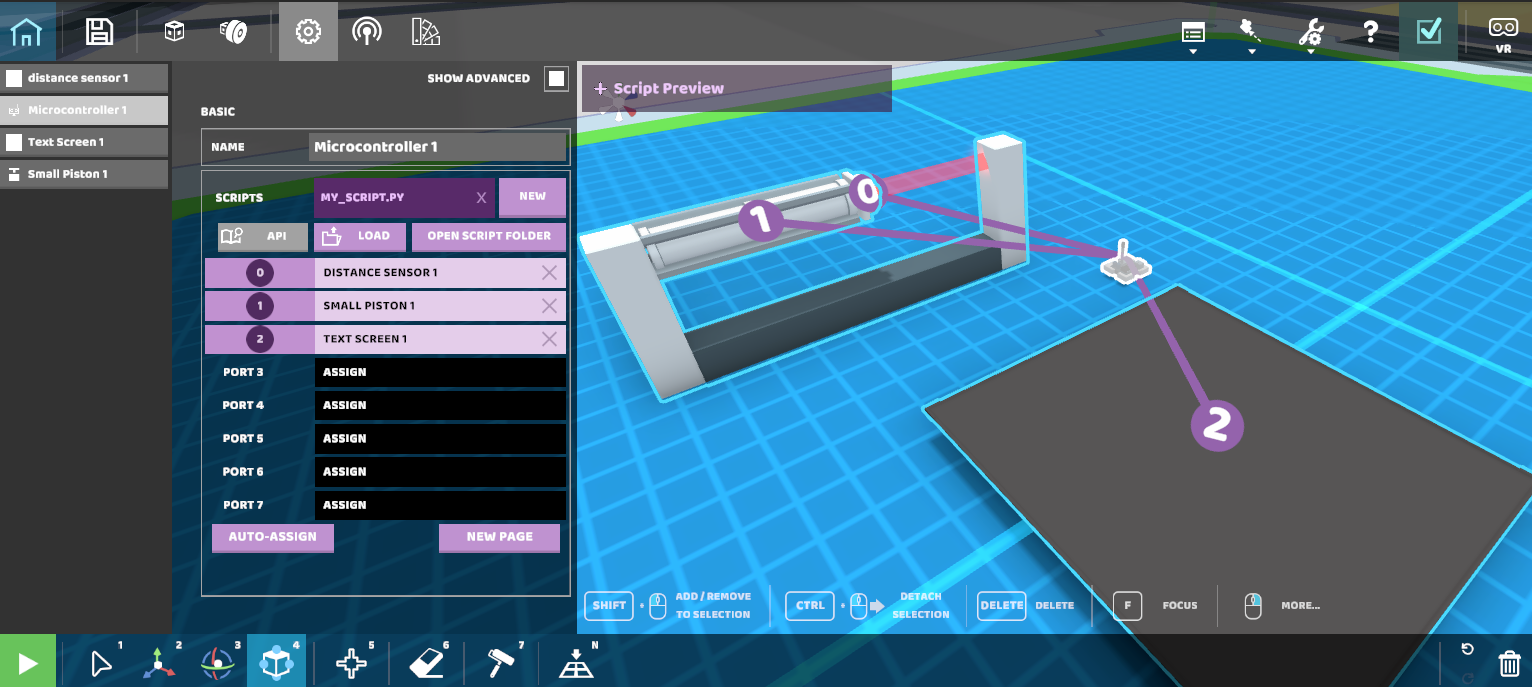
Then you can write a script that outputs the sensor data to the text screen as the piston pushes it in and out.
from sensors import DistanceSensor
from controllables import TextScreen, Piston

# get the sensor off of port 0
sensor = DistanceSensor(0)

# this just oscillates the piston on port 1
piston = Piston(1)
piston.oscillate = True
piston.move()

# setup the screen on port 2 with left alignment
screen = TextScreen(2)
screen.horizontal_alignment = TextScreen.HorizontalAlignment.LEFT

while True:
    # print out the distance with 3 places of precision
    screen.text = f'distance  = {sensor.distance():.3f}'
And Beyond!
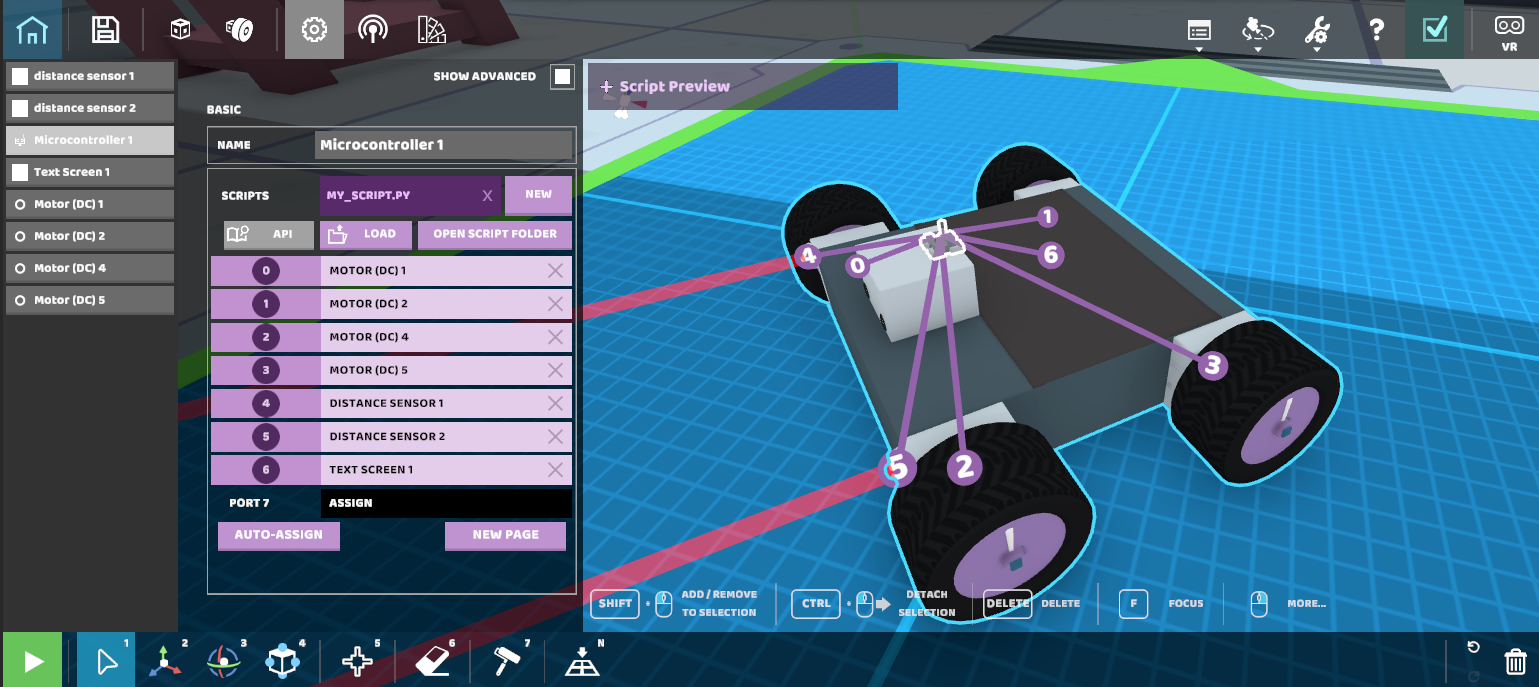
The following example is somewhat more complicated than the previous ones, but it is composed out of all those ideas put together. Setup your robot like in the image below, and paste the following code into the attached script. The robot will attempt to wander without hitting any walls. See if you can understand what the code is doing and play around with changing or improving it.
from sensors import DistanceSensor
from controllables import DCMotor, TextScreen
from time import time

# get all the motors
motors = [DCMotor(0),DCMotor(1),DCMotor(2),DCMotor(3)]
right_motors = motors[:2]
left_motors = motors[2:]

# get the distance sensors, "whiskers", on ports 4 and 5
sensors = [DistanceSensor(4),DistanceSensor(5)]

# define distance as the minimum of both whiskers
def distance():
    return min(sensors[0].distance(),sensors[1].distance())

# get the text screen from port 6
screen = TextScreen(6)
screen.horizontal_alignment = TextScreen.HorizontalAlignment.LEFT

# if the robot gets within 3 meters of
# something it will turn around
MIN_DISTANCE = 3


# make sure the left motors are flipped
for motor in left_motors:
    # "flipped" is the same as in game property "flip"
    motor.flipped = True
# and the right motors aren't flipped
for motor in right_motors:
    motor.flipped = False

# send the robot forward!
for motor in motors:
    motor.spin()

def turn_around():
    # slow down
    for motor in motors:
        motor.spin(.25)

    # start turning around
    for motor in left_motors:
        motor.flipped = False

    # keep track of the average distance that we see
    distances = []
    # turn for 5 seconds
    start_time = time()
    while time() - start_time < 5:
        distances.append(distance())

        screen.text = (
f"""surveying for a better direction
distance:  {distance():.0f}
time:      {time() - start_time:.0f}
"""
        )

    # turn back the other way
    for motor in left_motors:
        motor.flipped = True
    for motor in right_motors:
        motor.flipped = True

    # calculate the average to use a min threshold
    # Q: Is there a better threshold you can think of?
    average_distance = sum(distances) / len(distances)

    start_time = time()
    while distance() < average_distance:
        if time() - start_time > 5:
            # it took too long just give up
            break
            # Q: What can we do to make this
            # less likely?

        screen.text = (
f"""done surveying
trying to reach:  {average_distance:.0f}
current distance: {distance():.0f}
time:             {time() - start_time:.0f}
"""
        )

    # go forward
    for motor in left_motors:
        motor.flipped = True
    for motor in right_motors:
        motor.flipped = False

    # speed up
    for motor in motors:
        motor.spin(1)

while True:
    screen.text = "charging ahead"
    if distance() < MIN_DISTANCE:
        turn_around()
Footnotes
- 1
While the template is written in the standard form for python scripts, none of the boilerplater is actually required. You don’t need to write your code in a function if you don’t want to and the name
mainis just a convention. Unless you are planning on importing this script from elsewhere, you don’t need to check the value of__name__.